What is Calibration?
Calibration is required on several tests on the RightEye system. During calibration, the user is asked to look at a red dot as it moves to 9 different points on the screen. You can explain calibration to the user as "the system is getting a better idea of what your eyes look like in each direction."
Setting Up Your System for Calibration
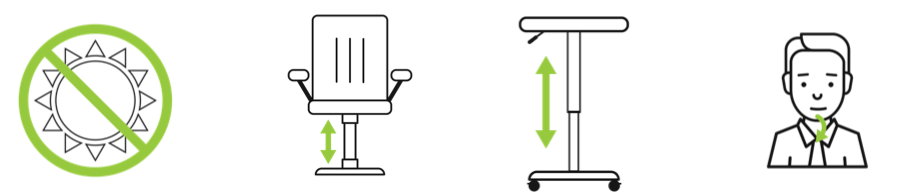
Glare
No direct sunlight should be on the eye tracker, monitor or test taker’s glasses. Place system away from windows.
Seating
Use a height adjustable chair or table while testing. A stable, firm-back chair without wheels (like a barber chair) is preferred.
Test taker should be sitting in a natural relaxed position with back against the chair. They should not “sit at attention”. Instruct them to “get comfortable”. This movement during the test which can occur if they sit too rigidly during the initial calibration.
If the person is VERY tall then they can slouch in the chair a bit and move their bottom forward – but move chair forward so test taker has back against chair.
Keep chin down. NOTE - Eyeglass wearers often keep their chins up.
Calibration Process
Eye Box
A live eye-box will be presented prior to calibration. Use this eye-box to correctly position the test-taker relative to the tracker.
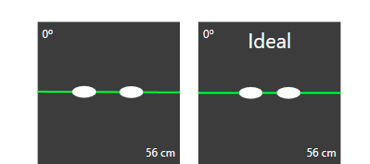
Head Tilt
The green line across the eyes and degrees in the top left corner indicate the amount of head tilt. Keep this line green at all times. A red line indicates the system will be unable to compensate for the head tilt.
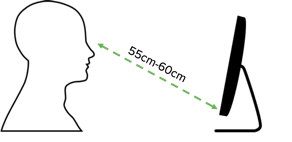
Distance
Distance is indicated in the lower right corner. Ideal z-distance (eyes to tracker) is 56cm, with a range of 55-60cm. The eye-box shows a live reading of the z-distance. Be sure to check this distance before calibration and before each test.
Note: For RightEye systems with a separate eye-tracker (purchased before March 2018), the Ideal z-distance (eyes to tracker) is 60cm, with a range of 58-65cm. Ensure that your monitor is perpendicular to the table (not tilted), and that the USB cord of the eye-tracker is to the right, such that your eye-tracker is tilted upward slightly.
Raise or lower the table or chair to center the eyes in the eye-box. You can also move the system on the table forward or backward to align.
Having Trouble?
Click here for help addressing calibration challenges.
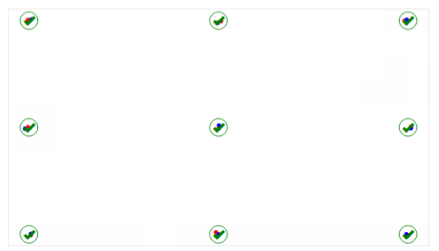
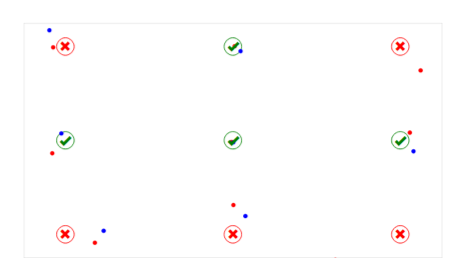
Calibration Results
 |
 |
|
Perfect Calibration |
Poor Calibration |
Up to three X’s are permitted within the calibration results. If test taker receives multiple red X’s, re-calibrate them. In most cases, they may not have been paying attention, or an environmental factor may be interfering with the test.
Tests can be run with as many as 3 red X’s but most test takers should get all green check marks. When someone has difficulty calibrating, this is not because the system is not working. It is related to environmental or individual issues like glare, internet or the alignment of the eyes.
- It is actually providing a hint regarding their overall situation.
- Tell them it is normal to take a few tries calibrating, so they do not become impatient and frustrated.
- Tell them to relax and be patient and they are likely to get through it.
Calibrating Tips
Test takers should remain as focused as possible on the red center of the calibration dot. If test taker misses more than 3 dots:
- If a dot appears to get stuck and remain on the screen, this is because the user is not making direct eye contact with both eyes. This can take more than one try for those with serious alignment issues.
- Ask them to turn their head to look at each dot, keeping chin down.
- If there are still more than 3 missed dots, then ask them to move shoulders back slightly to around 63 centimeters
- Remind test taker to blink normally during calibration and the tests
- Slight head movement is acceptable during calibration, and a person with vision issues may do better moving head to look straight at the red dot since angles present disparity between the eyes sometimes.
- Concussed individuals are more difficult to calibrate due to their eyes not teaming properly.
- Instruct test taker to concentrate specifically on the red dot inside the larger white dot when it stops at each calibration point.
- Proceed with the test if you have no more than 3 red X’s.
- After failed calibration, encourage head movement.
- Have test taker line their nose up with each corner of the monitor to demonstrate the maximum amount of head movement they can have during calibration. Re-calibrate with this increased amount of head movement.
- To improve results, have them lag behind the white dot and then quickly focus on the red dot in the middle once it stops.
- After 2 failed calibration attempts, the system adjusts and makes third calibration attempt easier.